
XEBEC Technology is specialized in “deburring” and developing innovative deburring tools and solution.
This article gives you a wide range of explanation from basic knowledge of “what is deburring” to the mechanism of
burr formation and how to remove burrs.
Index
・1. What is deburring?
・2. Troubles burrs can cause
・3. Mechanism of burr formation
・4. How to control burr formation
・5. How to measure the size and shape of burrs
・6. Types of burrs
・7. Methods of deburring
・8. Automated deburring by using a robot
・9. Automated deburring by using a machining center and a composite lathe
・10. Advantages in the automation of deburring
・11. Conclusion
A burr is a piece of material sticking out on the edges of a workpiece that is formed unintentionally
after machining material such as metal or resin.

In JIS (Japanese Industrial Standards), burr is defined as follows.
“Residues that remains outside of geometric form on its corner edge, attached during a process of
machining operation or molding.”
Quotation: JIS B 0051
With metal casting and injection mold, a material sometimes comes out from a gap of the mold.
It forms a sharp piece, and the piece is regarded as a type of burr.
Since burrs can cause various types of troubles in terms of quality, deburring is a necessary process at production sites.
“Remove all burrs” instructed on a design drawing of a part literally means finishing the part without burrs.
Burrs usually must be removed, therefore most of the design drawings for metal or resin parts instruct “Remove all burrs”.
At many production sites, deburring method and acceptable burr size are not specified.
In fact, detailed deburring process is decided by a tacit understanding and worker’s feeling.
Actually, “Remove all burrs” is an ambiguous direction and it sometimes causes trouble at production sites.
Since ambiguous directions can result in troubles and lowered productivity, some companies started setting detailed rules
and standards for deburring in recent years.
A suitable person for deburring is “the person who can concentrate on a detailed work for a long period of time”.
A strong sense of responsibility is also required because the deburring process influences the quality of products.
In addition, various tools and machines may be needed in the deburring process. It is important to be familiar with them.
A burr is a piece of material on a part that is not included in the design of the part.
Mainly in terms of quality, it causes the following troubles.
・Troubles when assembling
・Troubles in performance
・Troubles that burrs fall off from parts when in use
・Troubles that injure operators
A burr can disturb assembling of parts because of its protruding shape.
Specifically, it causes interference between a burr and adjacent parts.
A burr on the assembling part causes trouble to assemble as intended.
Sharp burrs affect the performance of a product.
If burrs are generated at a sliding part, the product may not show the performance expected at the design phase.
Most of the burrs are thin and do not have mechanical strength.
Therefore, pouring oil into the part of the burr or putting some power of impact/sliding causes burrs to come off
from a part unintentionally.
Burrs fallen off from a part can damage peripheral parts and block the flow passage.
Especially burrs formed on metal parts can hurt a person’s skin like a razor does because of the sharpness.
There are some cases about burr troubles.
Burrs on a part of a bicycle hurt the rider and end up in court.
A worker in a factory cut his finger and applied for worker’s compensation.
Quite a few cases are developed into serious problems.
The mechanism of burr formation comes from the machining method.
The mechanism varies depending on the machining methods listed below:
・Cutting / Grinding
・Shearing
・Casting / Injection molding
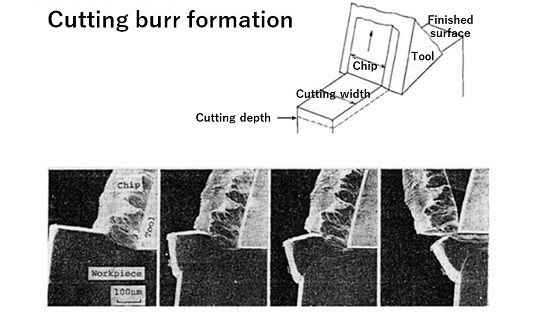
In the cutting/grinding/polishing process, when a cutting/grinding tool goes into the material,
the peripheral structure is slightly moved and makes a plastic flow.
To put it simply, it is the same as the change of shape occurs when pressing a gelled object such as jelly with a finger.
When a gelled object is pressed hard with a finger, the pushed part dents, but its surroundings rise lightly.
The plastic flow occurs in the cutting/grinding process is like this phenomenon occurs to a gelled object.
At the part a cutting tool going into the material, the peripheral structure is moved away
from the cutting/grinding tool then burrs are formed.
At the part of a cutting/grinding tool going out of the material, the peripheral structure is pushed away, and chips are torn off.
This causes burrs to be formed.
In the case of shearing such as stamping, burrs are formed in the process of tearing off the material.
The cause is when the material is torn off, a part of the material flows into the clearance of die and punch.
Imagine that you have a chunk of clay in your both hands, and you pull it to tear it into two.
In the shearing process, burrs are usually formed on the end side.
In casting and injection molding, material flows into a micro gap between the molds, turns solid and ends up becoming a burr.
Imagine an extra crispy part of a waffle.
A burr formed in casting and injection molding is just like this crispy part of the waffle.
Sometimes this type of burr is also called “PL burr”.
In the case of cutting/grinding and shearing, burrs are likely to be formed if plastic deformation is
likely to occur to the material.
On the other hand, the likeliness of burr formation in the casting/injection molding process is not affected
by the likeliness of occurrence of plastic deformation to the material.
It is possible to control burr formation by choosing materials, modifying the shape, and changing the machining method.
In the cutting/grinding/shearing process, burrs can be formed depending on the plasticity of materials.
By choosing the materials that hardly deform plastically, it is possible to control burr formation.
However, materials that hardly deform plastically tend to be difficult to process.
In many cases, it can be difficult to choose a material that has a mechanical property required for a part
and has a characteristic that burr formation hardly occurs.
Please note that it is possible to control burr formation by choosing materials only under limited conditions.
Even modifying the shape of a workpiece edge slightly can contribute to burr formation control.
Burrs formed on acute-angled edges tend to be large.
Therefore, you may be able to control burr formation by processing the workpiece edge to an obtuse angle.
The followings are the specific examples for processing.
・Corner rounding
・Chamfering
・Flattening the processing part
When trying to control burr formation by modifying the shape, it is important to reconsider the accuracy
and quality requirements of pre-processing.
For instance, if the burrs formed in pre-processing are too big, it might be difficult to take all burrs off
depending on a tool.
Requirements that are too strict such as ensuring sharp edges might lead to having trouble meeting them
because of the secondary micro burrs generated even after deburring with a tool.
The point is that you have to think of a way to control burrs formation from the design phase.
In some cases, you can control burrs by changing the cutting tools and tool path.
Especially with a rotary tool such as an end mill, it is effective to optimize the combination of
the rotating and moving directions of the tool.
You can also control burrs by avoiding excessive machining.
That means controlling burrs by reducing the cutting margin in one process or slowing down the feeding speed.
You can control burr formation by reducing the amount of plastic flow occurs.
In addition to controlling the size of burrs to be small, it is also effective to make burrs easier to remove.
That means controlling the direction of burrs to be formed by changing the order of machining
and changing the feeding direction of the cutting tool.
3 ways of controlling burr formation are introduced in this chapter.
However, it is not possible to eliminate burr formation completely.
Still, it is possible to control the size of burrs to be small and control where on workpieces large-sized burrs
to be formed if you consider burr formation in the design phase and machining stage.
It is a good idea to share the knowledge about burrs not only within the production site but also with other departments
such as the design department and production engineering department.
To evaluate burrs, you need to know the size of them.
For burr evaluation, there are lots of ways that are not quantitative such as visual check and comparison with a sample.
However, quantitative measurement is essential to know the condition and degree of burr formation correctly.
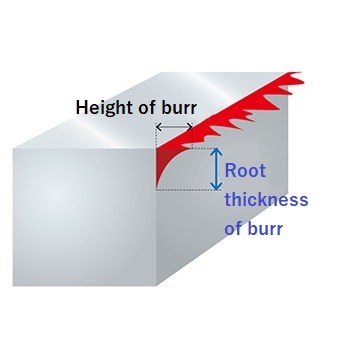
In general, the size of burr is described with its “height” and “root thickness”.
Burr removability strongly depends on its root thickness.
Therefore, for deburring and edge quality evaluation, it is important to know grasp the root thickness.
The burr measurement methods are roughly categorized into 2 types:
“By contact-type instrument” and “by non-contact-type instrument”.
Measurement by a contact-type instrument literally means a measuring tool touches burrs while measuring.
The followings are contact type measuring instruments.
・Micrometer
・Dial gauge
・Contour measuring instrument
etc.
The advantage of using a contact-type measuring instrument is that it is comparatively easy to measure.
But sometimes burrs can be fallen off and deformed because of the stress caused by the touch while measuring.
Therefore, you might not be able to measure correctly.
For a modest size of burr, you can also use a surface roughness tester.
However, since a surface roughness tester is originally for measuring surface roughness,
it is difficult to measure very accurately with its mechanism.
In the case of not deburring after the test, you can evaluate by performing a sharp edge test.
A sharp edge test is a safety evaluation performed by pressing the designated tester against the edge of a workpiece.
It is effective to perform this test when you need to check if burrs are so sharp that they can injure workers’ fingers or not.
In measurement by a non-contact-type instrument, the instrument does not touch burrs.
You can measure burrs more accurately with this type of instruments compared with a contact-type instrument
which tends to cause burr to fall off and deform.
There is data showing that 66% of companies performing burr evaluation installed non-contact-type instruments.
In burr measurement, non-contact-type instruments tend to be chosen over contact-type instruments.
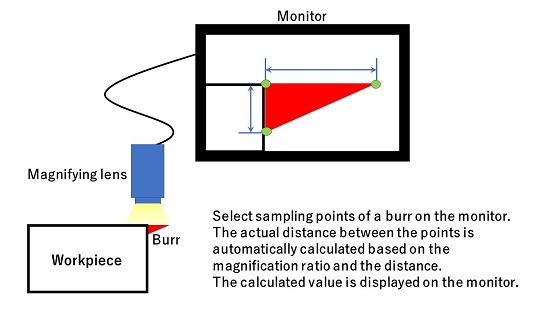
A digital microscope and a precision measuring microscope are frequently used as non-contact type of burr measuring instruments.
With these microscopes, you can observe an object on the monitor, not by looking into an eyepiece.
Select 2 sampling points of a burr on the monitor by using a controller, then you get a measured value
that is automatically calculated based on the size and the magnification ratio on the monitor.
There are 2 types of microscopes: one uses light, and the other uses laser light to get an image.
There is no difference in a basic principle for both types of microscopes.
The advantages to use a digital microscope and a precision measuring microscope are as follows.
・Easy to observe the object because a magnified image is displayed on the monitor.
・Easy to identify the roots and the tips of burrs.
・Possible to observe with multiple persons at the same time.
・Easy to store data because the images are in digital format.
・No falling off and deforming of burrs because the instrument does not touch burrs.
However, the disadvantage is that the sampling points can be different between operators
because it is up to the operators to select the points.
Therefore, manufacturers of these microscopes are working on improving their products such as improving the display
to show the workpiece edges clearer and introducing a feature to automatically obtain the sampling points
by linking with CAD data.
Recently the image analysis technology of digital microscopes and precision measuring microscopes is improving.
There is a model of microscope available that can automatically measure multiple workpieces placed randomly in a short time.
You need to select a measuring instrument depending on the purpose, measuring part, and the number of workpieces to be measured.
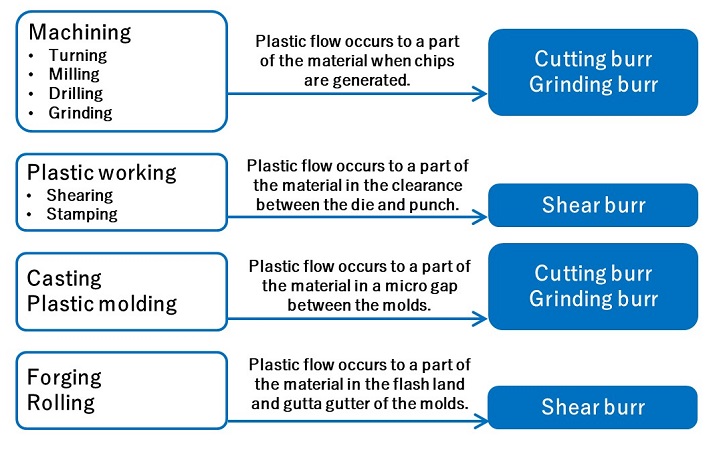
Burrs are classified as shown in the diagram below depending on the machining methods.
This classification is based on their formation mechanisms (plastic flow of the material).
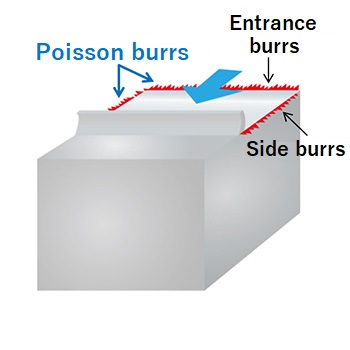
Cutting burrs are classified into 4 types depending on their forming mechanism.
Burrs are formed on the edge of a workpiece when the workpiece is cut,
and the edge is compressed and deformed orthogonally to the cutting direction.
This type of burr is called “Poisson burr”.
A burr that is formed when the workpiece started getting cut (when cutting tool goes into the workpiece)
is called “Entrance Burr”, and a burr formed on the sides while cutting is called “Side burr”.
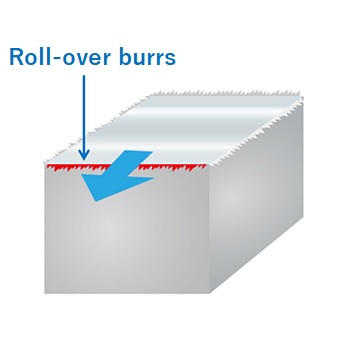
When a cutting tool goes off the edge of a workpiece, a plastic flow occurs, and some structure is pushed out
over toward the free surface of the workpiece.
This causes burrs to be formed on the edge of the workpiece.
This type of burr is called “Roll-over burr”.
It is also a part of the chip that did not come off from the workpiece and remained on the edge.
Roll-over burrs tends to be formed on soft metal materials with ductility.
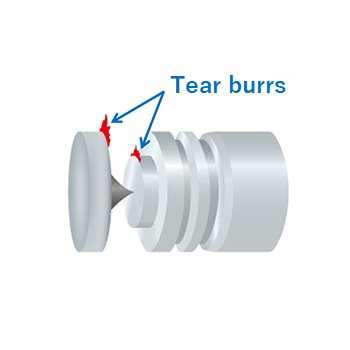
Burrs formed by the tear-off phenomenon at the start or end point of cutting are called “Tear burr”.
It tends to be formed at the start point of the cutting in the parting process and the endpoint of cutting in the threading process.
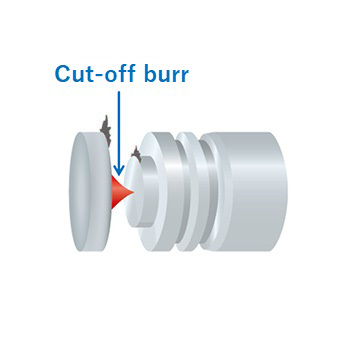
Burrs remained in the center of the cut surface, typically in a navel shape, are called “Cut-off burr”.
The cutting-off process and sawing process tend to cause cut-off burrs.
This type of burr is caused by the weight and vibration of the workpiece right before the cutting is completed.
The followings are deburring methods in details.
Please refer to this page also for the tools and methods of automation of deburring, showing with some images and a video clip.
Manually remove burrs by using the following tools.
・Specialized hand tool
・Polishing tool
・Brush
Remove burrs by going along the workpiece edges with a blade or a rotating grindstone/cutter.
A specialized hand tool is portable and about the size of a soldering iron, so you can operate it with one hand.
(e.g.)
Remove burrs by polishing workpieces.
You can use a rod-shaped file or press a workpiece against an abrasive belt or an abrasive disk.
(e.g.)
Remove burrs by scrubbing a workpiece with a nylon/metal brush.
Another way to remove burrs is to rotate the brush by attaching it on a hand tool or a large machine
and press the workpiece against the brush.
(e.g.)
The followings are the deburring methods using specialized machines.
・Barrel finishing
・Abrasive blasting, Liquid honing, Waterjet, Shot peening
・Abrasive flow machining
・Thermal deburring
・Electropolishing, Chemical polishing
The barrel finishing process is to put workpieces, abrasive media, water, and compound in a barrel tank
and give it a rotation or vibration.
In the tank, the workpieces are rubbed with abrasive media to remove burrs and round the edges.
The advantage is that not only deburring but also polishing and finishing edges can be done at the same time.
However, it is difficult to maintain the deburring quality to be uniform and there is a possibility of causing dents
on the workpiece surface.
(e.g.)
Abrasive blasting/liquid honing/waterjet/shot peening is a deburring method by jetting sand, water, or abrasive grain at workpieces.
In this method, the force that jet hitting and running on the workpiece surface is used for deburring.
In this method, water (working fluid), air pressure, and a rotor are used for jetting.
The followings are used as propellants:
・Sand
・Resin or glass powder
・Dry ice pellets
・Metal balls
It is possible to adjust the deburring area to be wider or smaller by changing the jetting method and the shape of the jet nozzle.
Since it is possible to make fine adjustment, it is suitable for deburring fine parts such as holes and grooves
and deburring multiple workpieces at one time.
(e.g.)
Abrasive flow machining is to flush grinding media inside of workpieces.
Grinding media is a mixture of viscoelastic medium (which is slimy as gum and oil) and abrasive compound.
Abrasive flow machining is mainly for removing burrs from edges of holes.
With this method, it is also possible to remove burrs from workpieces in complicated shapes
and workpieces made of high hardness materials.
(e.g.)
Thermal deburring is to remove burrs by burning them. It is similar to singeing for cloth and fiber.
This method is to put a mixture of oxygen and flammable gas such as methane and hydrogen in a sealed container
with workpieces and pressurize the content of the container.
After pressurizing, ignite the content with a spark plug to start instantaneous combustion like what happens inside of an engine.
Burrs turn to be oxides and come off from the workpieces.
Since it is instantaneous heating, only thin and sharply pointed burrs are burnt and the workpieces are not burnt.
The advantage of thermal deburring is that it is possible to remove burrs formed at deep positions where tools cannot reach.
However, since this method requires a big machine and strict safety management, it is becoming less popular in recent years.
(e.g.)
Electropolishing and chemical polishing are to remove burrs by dissolving them.
Since these are not mechanical processes, secondary burrs are never formed.
In addition, since these methods work at normal temperature, a distortion caused by heat will not occur.
In electropolishing, a workpiece is masked with insulating film except for the area with burrs generated to dissolve
and remove only burrs.
Since the process time is short, it is ideal for mass production lines.
In chemical polishing, a workpiece is not masked with film and the whole workpiece surface is dissolved slightly.
It is possible to remove only burrs with this method because burrs are easy to dissolve
compared with other parts of workpiece for their uneven structure.
Chemical polishing is suitable for removing micro burrs and makes the whole workpiece surface smooth.
(e.g.)
In the past, deburring was mainly done manually.
However, automated deburring using a robot (robot arm) is becoming popular in recent years.
You can mount a grinding tool or a rotary brush on a robot arm.
Or mount a workpiece on a robot arm and press the workpiece against a rotary brush during transportation.
Automation by using a robot does not require a large facility because it uses a generic robot
that is programmable by teaching.
The advantage of using a robot is that you can achieve an automated deburring system at a low cost.
However, it is not suitable for removing burrs on a complicated part (such as back burrs on cross holes)
and precise deburring.
You can automate the deburring process by using a machining center and a composite lathe.
A specialized machine is not required.
Simply use the same machine as the one used for other processes such as cutting.
The advantage is that it is possible to remove burrs precisely.
There are 2 methods to automate; one is to remove burrs by a blade such as a tool and a cutter,
and the other is to use a brush.
The following tools can be used for automation of deburring using a blade.
・Chamfering tool, cutter
・Tool with a blade (grindstone) comes in and out of the shaft with a spring
・XEBEC Back Burr Cutter & Deburring Tool Path
A chamfering tool and a cutter are ideal for deburring on the surface of the workpiece where you can easily access.
They can remove burrs formed on the edge of the workpiece in the chamfering process.
The advantage is, deburring and chamfering are done at the same time,
therefore you don’t need a dedicated tool or separate process only for deburring.
However, no matter how small the chamfering width is, it is not possible to get a sharp edge.
Also, there is a possibility of secondary burr formation.
This type of tool is used for burrs that are formed on the edges of through-holes.
For a blade or a grindstone to come out of the shaft, this type of tool utilizes spring force,
the centrifugal force that occurs by rotating the tool or coolant that is sent into the inside of the tools.
Image a hook of the buckle for the type of tools that utilizes spring force.
The tool has a blade instead of the hook and removes burrs on the front side while rotating at first.
Next, when the tool is pushed into the hole, the blade is pushed into the tool shaft and the tool passes through the hole.
When reaching the opposite side of the hole, the blade comes out again by spring force to remove burrs on the backside.
With this type of tool, it is possible to remove burrs by with relatively easy control.
However, most of this type of tool can only remove burrs on holes drilled on flat plates.
It is not possible to remove burrs on holes drilled on cylinders and diagonal holes.
Additionally, the motion range of the blade is limited so that you need to use a tool designated tools for each hole size.
When you need to remove burrs from multiple holes, you need to select a tool suitable for each hole profile.
When using a 3-axis simultaneous control machine, you can remove burrs in an advanced manner
by combining the Cutter and the movement control Tool Path.
We offer a deburring specialized Cutter and a custom-made Tool Path program as a set.
The followings are the advantages of using XEBEC Back Burr Cutter & Deburring Tool Path:
・Possible to remove burrs formed on the backside of a diagonal hole, eccentric hole, and offset hole.
・Possible to remove burrs on holes in various sizes and shapes with a single Cutter.
Contributes to reducing the number of tools and shortening the process time.
・You can get high-quality finishing and uniform deburring range because the optimized Tool Path controls
the degree of approach angle of the Cutter.
・You do not need to create and input a program manually because you can simply let us know the dimensions
around the deburring part to order your own Tool Path program.
However, please note that the accuracy is required in the deburring areas of workpieces.
Without the accuracy of hole position, coaxial degree, and the height of surface,
it is not possible to achieve high-quality deburring.
Additionally, it is not suitable for deburring on the surface of cast metal.
The difference between a tool with a blade and a brush is that the brush has elasticity. With a brush,
secondary burrs are not likely to be generated because of its elasticity.
It does not require a precise control even for a workpiece in a complicated shape.
In the case of using a brush, you need to choose a suitable type of brush depending on where burrs are formed.
There are brushes available that are made of various materials such as nylon, wire, and ceramics.
Choose a brush material suitable considering the size of burrs, material of the workpiece, and the tool life duration.
The followings are the brush types:
・Inner diameter brush, cross-hole brush
・Surface brush
・Wheel-type brush
To remove burrs formed on the inner diameter of a cross hole, insert an inner diameter brush/cross-hole brush
from the axis hole (primary hole).
There are 2 types of inner diameter /cross-hole brushes available:
Brushes with the diameter designed to be slightly larger than the inner diameter of the hole to be pushed into the hole
and brushes with the bristles to be expanded by centrifugal force.
Both types of brushes work with the shapes of bristles changing.
Therefore, one brush can be used for some range of hole diameters.
A brush to push into holes has bristle made of wire (stainless steel).
The advantage of this type of brush is the low cost.
However, it cannot remove burrs formed around a blind hole.
A brush with bristle expands by centrifugal force is made of either wire (stainless steel) or ceramic.
A ceramic brush is more expensive than a wire brush, but it has excellent durability.
However, keep in mind that a ceramic brush needs a higher rotational speed compared with a wire brush.
As a similar tool as an inner diameter brush/cross-hole brush, there is another type of tool
that has a rounded abrasive stone on the tip of the brush.
Imagine a bunch of grapes in a cylindrical shape.
With this type of brush, you can remove burrs that are harder than the ones you can remove with a normal brush.
Also, since the brush has elasticity, it is suitable for uneven surfaces.
However, you need to choose a brush that fits the hole size.
A surface brush is ideal for removing burrs on the surface of workpieces after the milling process
using a face mill and end mill, and the drilling process.
Regardless of the brush materials, the shapes are almost the same.
It removes surface burrs by moving it like a brush on a polisher machine that polishes a floor.
A low price is the advantage of a resin brush and metal brush.
However, these brushes have low durability. Therefore, the tip of the brush spreads out as you use it repeatedly.
Deformation of the brush leads to the failure of deburring, so it is necessary to replace the brush regularly.
A ceramic brush is pricier than a resin/metal brush.
However, it has excellent durability.
This type of brush has a high grinding power, and it can remove burrs on a wide range of materials.
You can use it not only to remove burrs but also to remove a tool mark and polish the workpiece surface after machining.
A wheel-type brush is ideal for deburring on the surface parallel to the rotation axis of the brush.
Specifically, it is ideal for removing burrs formed on the inner diameter of the large cylinder,
side surface (rising wall), and a male screw.
It is suitable for resin, metal, and ceramic fiber.
The followings are the advantages in the automation of deburring:
・Shortening the process time
・Stabilizing the deburring quality
・Effective utilization of human resources
In the past, deburring was done mainly by handwork.
However, the maximum work volume of handwork is limited even if it is done by a skilled worker.
By automating the deburring process, it is possible to remove burrs in the same process as other machining processes
such as cutting.
The cycle time may be a bit longer, however, you can reduce the whole process time
because there is no human interference involved in the deburring process.
Due to the differences in each worker’s technique, the quality may vary when you remove burrs manually.
However, the quality does not vary with automated.
There are many cases of stabilizing the quality by implementing automated deburring.
At one production site, 100% of inspection was conducted by a microscope for the workpieces
that were deburred manually in the past.
Then they implemented automated deburring with a brush.
After that, the defect ratio was significantly reduced.
Besides, while securing the quality, they reduced man-hours for inspection by switching from full to sampling inspection.
You can get better use of human resources available by shifting them to another section
if you switch the handwork to automation and reduce the work time of operation.
Especially at a production site that faces human resource shortages, automation of deburring
brings a big advantage of reducing cost.
Deburring may seem like a low-profile work, but it is a very important process for machining the metal and resin.
If burrs are not removed appropriately, they can cause various problems.
Therefore, precise deburring is required.
Improving the deburring process can lead to solving various problems that a production site may hold.
For example, automation of deburring contributes to reducing manpower and reproducing expert skills.
By reviewing the deburring from the design and process phase, you may find a lot of advantages to your production site.
